<?xml version="1.0" encoding="utf-8"?>
<feed xmlns="http://www.w3.org/2005/Atom"><title>satoshi.ke</title>
<generator>Emacs webfeeder.el</generator>
<link href="https://satoshi.ke/"/>
<link href="https://satoshi.ke/atom.xml" rel="self"/>
<id>https://satoshi.ke/atom.xml</id>
<updated>2026-07-17T16:52:17+03:00</updated>
<entry>
  <title>Digital Signatures</title>
  <author><name>satoshiken</name></author>
  <summary>Published on Jan 26, 2024 15:49 by satoshiken</summary>
  <content type="html"><![CDATA[<div id="content" class="content">
 <h1 class="title">Digital Signatures
 <br></br> <span class="subtitle">Published on Jan 26, 2024 15:49 by satoshiken</span>
</h1>
 <div id="table-of-contents" role="doc-toc">
 <h2>Table of Contents</h2>
 <div id="text-table-of-contents" role="doc-toc">
 <ul> <li> <a href="#orgf079ff5">1. Intro</a></li>
 <li> <a href="#org95e3149">2. Signing</a></li>
 <li> <a href="#org821190f">3. Signature Verification</a></li>
 <li> <a href="#org3863b4f">4. Uses</a></li>
 <li> <a href="#org80dfc1f">5. Examples in code</a>
 <ul> <li> <a href="#org67a3250">5.1. Python</a></li>
 <li> <a href="#org85987f0">5.2. JavaScript</a></li>
</ul></li>
 <li> <a href="#org9850c66">6. Conclusion</a></li>
</ul></div>
</div>
 <div id="outline-container-orgf079ff5" class="outline-2">
 <h2 id="orgf079ff5"> <span class="section-number-2">1.</span> Intro</h2>
 <div class="outline-text-2" id="text-1">
 <p>
In the previous  <a href="public_key_encryption.html">article</a>, we introduced asymmetric encryption, and
particularly the use of public key encryption for transmitting
secrets. In this article, we shall take a look at  <b>digital
signatures</b>, another application of asymmetric encryption.
</p>

 <p>
In public key encryption, we used the recipient's public key to
encrypt the message in transit so that only the recipient could
decrypt it using their private key.
</p>

 <p>
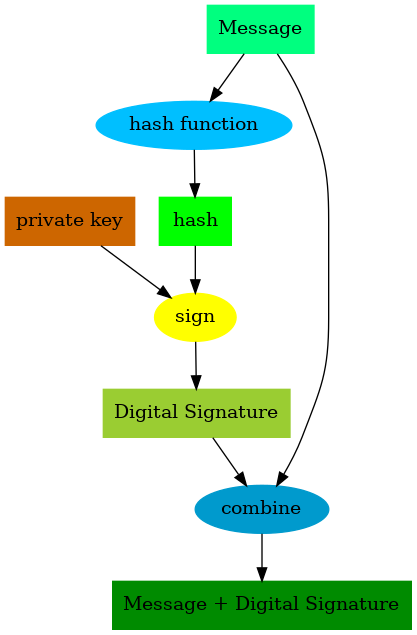
By contrast, in a digital signature system, the sender signs a hash of
the message with their private key producing a signature. The
signature is attached to the message and sent to the recipient. The
recipient can then use the sender's public key to verify the
signature.
</p>

 <p>
The goal is not to hide the message from eavesdroppers, but to prove
to the recipient that the message is approved by the sender and was
not tampered with in transit.
</p>
</div>
</div>
 <div id="outline-container-org95e3149" class="outline-2">
 <h2 id="org95e3149"> <span class="section-number-2">2.</span> Signing</h2>
 <div class="outline-text-2" id="text-2">

 <div id="orgd856d4e" class="figure">
 <p> <img src="img/digital_signature_signing.png" alt="digital_signature_signing.png"></img></p>
 <p> <span class="figure-number">Figure 1: </span>Illustration of signing</p>
</div>

 <p>
The sender will first generate a hash of the message to get a
fixed-size representation of it (we discussed hashing in this
 <a href="hashing.html">article</a>).
</p>

 <p>
The hash will then be signed using the sender's private key producing
a  <b>signature</b>. This signature will be attached to the original message
and sent to the recipient.
</p>
</div>
</div>
 <div id="outline-container-org821190f" class="outline-2">
 <h2 id="org821190f"> <span class="section-number-2">3.</span> Signature Verification</h2>
 <div class="outline-text-2" id="text-3">

 <div id="org6339395" class="figure">
 <p> <img src="img/digital_signature_verifying.png" alt="digital_signature_verifying.png"></img></p>
 <p> <span class="figure-number">Figure 2: </span>Illustration of verification</p>
</div>

 <p>
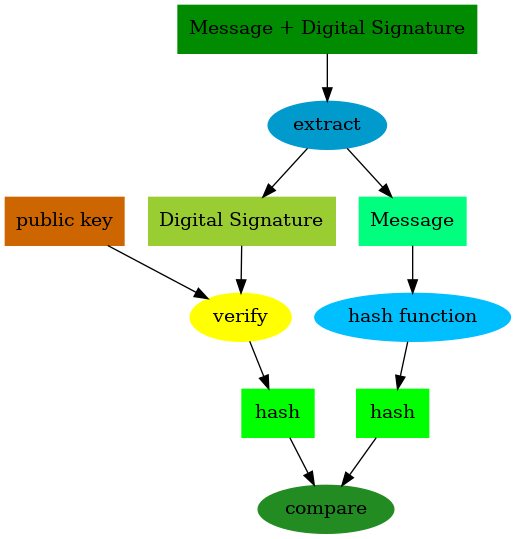
On receiving the signed message, the recipient will verify the
signature with the sender's public key which recovers the original
hash of the message.
</p>

 <p>
Additionally, the recipient also independently generates another hash of
the received message on their side. If the two hashes match, this
confirms to the recipient that the message they received is the same as
the one approved by the sender.
</p>

 <p>
This also confirms that the message wasn't tampered with in transit,
because only the sender's private key could have been used to create a
signature that can be verified with their public key.
</p>
</div>
</div>
 <div id="outline-container-org3863b4f" class="outline-2">
 <h2 id="org3863b4f"> <span class="section-number-2">4.</span> Uses</h2>
 <div class="outline-text-2" id="text-4">
 <p>
Some uses of digital signatures:
</p>

 <ul class="org-ul"> <li>Software developers can sign the software packages and binaries they
produce, which users (manually or automatically through package
managers) can verify against the developers' published public keys
to check for tampering.</li>

 <li>In blockchain systems, transactions sent by an account are sent along
with a signature which can be used to verify all valid transactions
from the account.</li>
</ul></div>
</div>
 <div id="outline-container-org80dfc1f" class="outline-2">
 <h2 id="org80dfc1f"> <span class="section-number-2">5.</span> Examples in code</h2>
 <div class="outline-text-2" id="text-5">
 <p>
We take a look at signing and verifying in Python and JavaScript.
</p>
</div>
 <div id="outline-container-org67a3250" class="outline-3">
 <h3 id="org67a3250"> <span class="section-number-3">5.1.</span> Python</h3>
 <div class="outline-text-3" id="text-5-1">
 <div class="org-src-container">
 <pre class="src src-python"> <span style="font-weight: bold;">import</span> base64

 <span style="font-weight: bold;">from</span> cryptography.hazmat.primitives.asymmetric  <span style="font-weight: bold;">import</span> rsa, padding, utils
 <span style="font-weight: bold;">from</span> cryptography.hazmat.primitives  <span style="font-weight: bold;">import</span> hashes

 <span style="font-weight: bold; font-style: italic;">private_key</span> = rsa.generate_private_key(public_exponent=65537, key_size=2048)
 <span style="font-weight: bold; font-style: italic;">public_key</span> = private_key.public_key()

 <span style="font-weight: bold; font-style: italic;">message</span> =  <span style="font-style: italic;">"The quick brown fox jumps over the lazy dog"</span>
 <span style="font-weight: bold; font-style: italic;">hash_algorithm</span> = hashes.SHA256()


 <span style="font-weight: bold;">def</span>  <span style="font-weight: bold;">hash_function</span>(msg_bytes):
     <span style="font-weight: bold; font-style: italic;">hasher</span> = hashes.Hash(hash_algorithm)
    hasher.update(msg_bytes)
     <span style="font-weight: bold;">return</span> hasher.finalize()


 <span style="font-weight: bold; font-style: italic;">sender_side_hash</span> = hash_function( <span style="font-weight: bold;">bytes</span>(message,  <span style="font-style: italic;">"utf-8"</span>))


 <span style="font-weight: bold;">def</span>  <span style="font-weight: bold;">sign</span>(message_hash, private_key):
     <span style="font-weight: bold;">return</span> private_key.sign(
        message_hash,
        padding.PSS(
            mgf=padding.MGF1(hash_algorithm), salt_length=padding.PSS.MAX_LENGTH
        ),
        utils.Prehashed(hash_algorithm),
    )


 <span style="font-weight: bold; font-style: italic;">signature</span> = sign(sender_side_hash, private_key)

 <span style="font-weight: bold; font-style: italic;"># </span> <span style="font-weight: bold; font-style: italic;">At this point, the signature is sent to the recipient along with
</span> <span style="font-weight: bold; font-style: italic;"># </span> <span style="font-weight: bold; font-style: italic;">the message. The signature can be base64 encoded like below
</span> <span style="font-weight: bold; font-style: italic;"># </span> <span style="font-weight: bold; font-style: italic;">so that it can be safely transmitted across the network:
</span> <span style="font-weight: bold; font-style: italic;">b64_signature</span> = base64.b64encode(signature)

 <span style="font-weight: bold; font-style: italic;"># </span> <span style="font-weight: bold; font-style: italic;">and decoded like this on the receiving side:
</span> <span style="font-weight: bold; font-style: italic;">signature</span> = base64.b64decode(b64_signature)

 <span style="font-weight: bold; font-style: italic;">recipient_side_hash</span> = hash_function( <span style="font-weight: bold;">bytes</span>(message,  <span style="font-style: italic;">"utf-8"</span>))


 <span style="font-weight: bold;">def</span>  <span style="font-weight: bold;">verify</span>(public_key, signature, message_hash):
    public_key.verify(
        signature,
        message_hash,
        padding.PSS(
            mgf=padding.MGF1(hash_algorithm), salt_length=padding.PSS.MAX_LENGTH
        ),
        utils.Prehashed(hash_algorithm),
    )


 <span style="font-weight: bold; font-style: italic;"># </span> <span style="font-weight: bold; font-style: italic;">would raise an exception if verification fails
</span>verify(public_key, signature, recipient_side_hash)
</pre>
</div>

 <p>
In Python, we use the third party library  <code>cryptography</code> that can be installed via:
</p>

 <div class="org-src-container">
 <pre class="src src-sh">pip install cryptography
</pre>
</div>

 <p>
We start by generating a sender public/private key pair to be used for
signing and verifying. On the sender's side, the hash of the plaintext
message is generated then signed using the sender's private key to
produce the signature.
</p>

 <p>
The signature would then be attached to the message and sent to the
recipient. We've assumed that part and don't show it here.
</p>

 <p>
When the receiver gets the signed message, they independently generate
a hash of the received message using the same algorithm that was used
on the sender's side. This, along with the signature will be passed to
the public key's verify method. Under the hood, the verify method will
derive the original hash from the signature and compare it with the
hash provided.
</p>

 <p>
If they match, the signature is considered verified, otherwise the
 <code>verify</code> method throws an exception.
</p>
</div>
</div>
 <div id="outline-container-org85987f0" class="outline-3">
 <h3 id="org85987f0"> <span class="section-number-3">5.2.</span> JavaScript</h3>
 <div class="outline-text-3" id="text-5-2">
 <div class="org-src-container">
 <pre class="src src-javascript"> <span style="font-weight: bold;">const</span> { generateKeyPairSync, createSign, createVerify } =  <span style="font-weight: bold;">await</span>  <span style="font-weight: bold;">import</span>( <span style="font-style: italic;">"node:crypto"</span>);

 <span style="font-weight: bold;">const</span> { publicKey, privateKey } = generateKeyPairSync( <span style="font-style: italic;">'rsa'</span>, {
    publicExponent: 65537,
    modulusLength: 2048,
});

 <span style="font-weight: bold;">const</span>  <span style="font-weight: bold; font-style: italic;">message</span> =  <span style="font-style: italic;">"The quick brown fox jumps over the lazy dog"</span>;

 <span style="font-weight: bold;">const</span>  <span style="font-weight: bold; font-style: italic;">sign</span> = (messageBytes, privateKey) => {
     <span style="font-weight: bold;">const</span>  <span style="font-weight: bold; font-style: italic;">signer</span> = createSign( <span style="font-style: italic;">"SHA256"</span>);
    signer.update(messageBytes);
    signer.end();
     <span style="font-weight: bold;">return</span> signer.sign(privateKey);
};

 <span style="font-weight: bold;">let</span>  <span style="font-weight: bold; font-style: italic;">signature</span> = sign(Buffer.from(message), privateKey);

 <span style="font-weight: bold; font-style: italic;">// </span> <span style="font-weight: bold; font-style: italic;">At this point, the signature is sent to the recipient along with
</span> <span style="font-weight: bold; font-style: italic;">// </span> <span style="font-weight: bold; font-style: italic;">the message. The signature can be base64 encoded like below
</span> <span style="font-weight: bold; font-style: italic;">// </span> <span style="font-weight: bold; font-style: italic;">so that it can be safely transmitted across the network:
</span> <span style="font-weight: bold;">let</span>  <span style="font-weight: bold; font-style: italic;">b64Signature</span> = signature.toString( <span style="font-style: italic;">"base64"</span>);

 <span style="font-weight: bold; font-style: italic;">// </span> <span style="font-weight: bold; font-style: italic;">and decoded like this:
</span>signature = Buffer.from(b64Signature,  <span style="font-style: italic;">"base64"</span>);

 <span style="font-weight: bold;">const</span>  <span style="font-weight: bold; font-style: italic;">verify</span> = (publicKey, signature, messageBytes) => {
     <span style="font-weight: bold;">const</span>  <span style="font-weight: bold; font-style: italic;">verifier</span> = createVerify( <span style="font-style: italic;">"SHA256"</span>);
    verifier.update(messageBytes);
    verifier.end();
     <span style="font-weight: bold;">return</span> verifier.verify(publicKey, signature);
};

 <span style="font-weight: bold;">let</span>  <span style="font-weight: bold; font-style: italic;">isVerified</span> = verify(publicKey, signature, Buffer.from(message));

console.assert(isVerified ==  <span style="font-weight: bold; text-decoration: underline;">true</span>);  <span style="font-weight: bold; font-style: italic;">// </span> <span style="font-weight: bold; font-style: italic;">should pass</span>
</pre>
</div>

 <p>
In JavaScript, we use utilities provided by Node.js's built-in  <code>crypto</code>
module.
</p>

 <p>
We generate a sender's public/private key pair and use the private key
to sign the message. The  <code>signer</code> object takes care of hashing under the
hood using the hashing algorithm argument passed to it.
</p>

 <p>
On the receiver's side, the sender's public key is likewise used to
verify the signature by the  <code>verifier</code> object. The verify method
returns a boolean value indicating whether the signature successfully
passes verification.
</p>
</div>
</div>
</div>
 <div id="outline-container-org9850c66" class="outline-2">
 <h2 id="org9850c66"> <span class="section-number-2">6.</span> Conclusion</h2>
 <div class="outline-text-2" id="text-6">
 <p>
In this article, we discussed the application of asymmetric encryption
in implementing a digital signature system. We saw how it contrasts with
public key encryption: the sender uses their private key and recipient
uses the sender's public key.
</p>

 <p>
Whereas in public key encryption, we are concerned about confidentiality
of the message, in a digital signature system, we are concerned about
the authenticity and integrity of the message.
</p>

 <p>
For a more in-depth exploration, check out the  <a href="https://www.crypto101.io/">CRYPTO101</a> course
and the  <a href="https://cryptopals.com/">Cryptopals</a> challenge.
</p>
</div>
</div>
</div>]]></content>
  <link href="https://satoshi.ke/digital_signatures.html"/>
  <id>https://satoshi.ke/digital_signatures.html</id>
  <updated>2026-07-17T16:37:00+03:00</updated>
</entry>
<entry>
  <title>Public Key Encryption</title>
  <author><name>satoshiken</name></author>
  <summary>Published on Jan 25, 2024 11:43 by satoshiken</summary>
  <content type="html"><![CDATA[<div id="content" class="content">
 <h1 class="title">Public Key Encryption
 <br></br> <span class="subtitle">Published on Jan 25, 2024 11:43 by satoshiken</span>
</h1>
 <div id="table-of-contents" role="doc-toc">
 <h2>Table of Contents</h2>
 <div id="text-table-of-contents" role="doc-toc">
 <ul> <li> <a href="#org96f0aab">1. Introduction</a></li>
 <li> <a href="#orgcd90d61">2. Public Key Encryption</a>
 <ul> <li> <a href="#org72540cf">2.1. Uses</a></li>
 <li> <a href="#orgca878aa">2.2. Examples in code</a>
 <ul> <li> <a href="#orgb3e8fca">2.2.1. Python</a></li>
 <li> <a href="#orge15d600">2.2.2. JavaScript</a></li>
</ul></li>
</ul></li>
 <li> <a href="#org72440f3">3. Conclusion</a></li>
</ul></div>
</div>
 <div id="outline-container-org96f0aab" class="outline-2">
 <h2 id="org96f0aab"> <span class="section-number-2">1.</span> Introduction</h2>
 <div class="outline-text-2" id="text-1">
 <p>
In a previous  <a href="symmetric_encryption.html">article</a>, we discussed symmetric encryption. In this
article we'll take a look at asymmetric encryption which is also
known as public key cryptography.
</p>

 <p>
In symmetric encryption, the same secret key is used for both encoding
and decoding messages. However, as we discussed in the previous
article, transmitting this secret key securely can be a
challenge.
</p>

 <p>
Public key cryptography is one solution to this problem. It
involves the use of two keys: a public key, which is openly
accessible, and a private key, which is kept secret.
</p>

 <p>
The two keys are mathematically linked, plaintext encrypted with a
user's the public key can only be decrypted with their corresponding
private key. Likewise, plaintext signed with the user's private key
can only be verified with the corresponding public key.
</p>

 <p>
The former is used in a  <b>public key encryption</b> system, and will be
the subject of this article. The latter is used in a  <b>digital
signature</b> system which will be discussed in the next article.
</p>

 <p>
(Update: Article on digital signatures published  <a href="digital_signatures.html">here</a>)
</p>
</div>
</div>
 <div id="outline-container-orgcd90d61" class="outline-2">
 <h2 id="orgcd90d61"> <span class="section-number-2">2.</span> Public Key Encryption</h2>
 <div class="outline-text-2" id="text-2">
 <p>
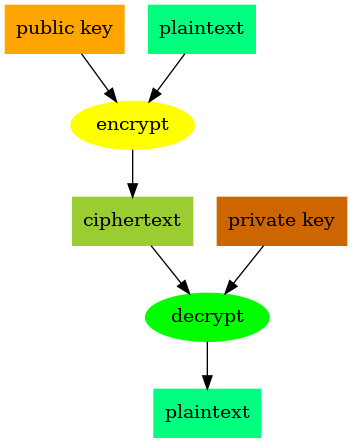
In a public key encryption system, participants distribute their
public keys freely but keep their private keys secret. Anyone who
wants to send a message to a recipient will encrypt it using their
public key. Only the private key can be used to decrypt the resulting
ciphertext and as long as the recipient keeps their private key
secret, only they can decrypt the message.
</p>


 <div id="org8a8a5ad" class="figure">
 <p> <img src="img/public_key_encryption.png" alt="public_key_encryption.png"></img></p>
 <p> <span class="figure-number">Figure 1: </span>illustration of public key encryption</p>
</div>

 <p>
There are different types of algorithms that are used to implement
public key encryption. In general, their security relies on the
mathematical properties that can be used to design puzzles that are
too computationally demanding to solve as they lack a known efficient
solution.
</p>

 <p>
For example, one of the pioneering techniques known as  <a href="https://en.wikipedia.org/wiki/RSA_(cryptosystem)">RSA</a> relies on
the fact that it is extremely  <a href="https://en.wikipedia.org/wiki/Modular_exponentiation">difficult</a> to factorize large integer
numbers.
</p>

 <p>
Because public key encryption is computationally intensive, in
situations where lengthy messages or frequently exchanged messages
need to be encrypted, public key encryption is used to initially send a
secret key to the recipient. Subsequent communication can then more
efficiently use the shared secret key for symmetric encryption.
</p>
</div>
 <div id="outline-container-org72540cf" class="outline-3">
 <h3 id="org72540cf"> <span class="section-number-3">2.1.</span> Uses</h3>
 <div class="outline-text-3" id="text-2-1">
 <p>
Some uses of public key encryption:
</p>

 <ul class="org-ul"> <li>Issuing and validation of certificates used to establish secure web
communication via SSL/TLS</li>

 <li>Encrypted email communication technologies such as PGP rely on
public key encryption.</li>

 <li>Secure messaging services like Signal and WhatsApp utilize
public key encryption to exchange secure session tokens for
encrypted communication.</li>
</ul></div>
</div>
 <div id="outline-container-orgca878aa" class="outline-3">
 <h3 id="orgca878aa"> <span class="section-number-3">2.2.</span> Examples in code</h3>
 <div class="outline-text-3" id="text-2-2">
 <p>
These are basic examples in Python and JavaScript for the purpose of
illustration.
</p>
</div>
 <div id="outline-container-orgb3e8fca" class="outline-4">
 <h4 id="orgb3e8fca"> <span class="section-number-4">2.2.1.</span> Python</h4>
 <div class="outline-text-4" id="text-2-2-1">
 <div class="org-src-container">
 <pre class="src src-python"> <span style="font-weight: bold;">from</span> cryptography.hazmat.primitives.asymmetric  <span style="font-weight: bold;">import</span> rsa, padding
 <span style="font-weight: bold;">from</span> cryptography.hazmat.primitives  <span style="font-weight: bold;">import</span> hashes

 <span style="font-weight: bold; font-style: italic;">private_key</span> = rsa.generate_private_key(public_exponent=65537, key_size=2048)
 <span style="font-weight: bold; font-style: italic;">public_key</span> = private_key.public_key()

 <span style="font-weight: bold; font-style: italic;">plaintext_in</span> =  <span style="font-style: italic;">"The quick brown fox jumps over the lazy dog"</span>


 <span style="font-weight: bold;">def</span>  <span style="font-weight: bold;">encrypt</span>(plaintext, public_key):
     <span style="font-weight: bold;">return</span> public_key.encrypt(
        plaintext,
        padding.OAEP(
            mgf=padding.MGF1(algorithm=hashes.SHA256()),
            algorithm=hashes.SHA256(),
            label= <span style="font-weight: bold; text-decoration: underline;">None</span>,
        ),
    )


 <span style="font-weight: bold; font-style: italic;">ciphertext</span> = encrypt( <span style="font-weight: bold;">bytes</span>(plaintext_in,  <span style="font-style: italic;">"utf-8"</span>), public_key)


 <span style="font-weight: bold;">def</span>  <span style="font-weight: bold;">decrypt</span>(ciphertext, private_key):
     <span style="font-weight: bold;">return</span> private_key.decrypt(
        ciphertext,
        padding.OAEP(
            mgf=padding.MGF1(algorithm=hashes.SHA256()),
            algorithm=hashes.SHA256(),
            label= <span style="font-weight: bold; text-decoration: underline;">None</span>,
        ),
    )


 <span style="font-weight: bold; font-style: italic;">bytes_out</span> = decrypt(ciphertext, private_key)
 <span style="font-weight: bold; font-style: italic;">plaintext_out</span> = bytes_out.decode( <span style="font-style: italic;">"utf-8"</span>)

 <span style="font-weight: bold;">assert</span> plaintext_in == plaintext_out   <span style="font-weight: bold; font-style: italic;"># </span> <span style="font-weight: bold; font-style: italic;">should be equal</span>
</pre>
</div>

 <p>
In python, we use the third party library  <code>cryptography</code> that
can be installed via:
</p>

 <div class="org-src-container">
 <pre class="src src-sh">pip install cryptography
</pre>
</div>

 <p>
The first step is generating a recipient's public/private key pair
using the RSA algorithm. We then encrypt the plaintext using the
public key and finally decrypt the ciphertext using the private key.
</p>

 <p>
Additional parameters required for the RSA such as  <b>public exponent</b>,
 <b>key size</b> and  <b>padding</b> are also chosen to be common ones. One has to
be careful adjusting these and a detailed understanding of the
underlying algorithms is required.
</p>
</div>
</div>
 <div id="outline-container-orge15d600" class="outline-4">
 <h4 id="orge15d600"> <span class="section-number-4">2.2.2.</span> JavaScript</h4>
 <div class="outline-text-4" id="text-2-2-2">
 <div class="org-src-container">
 <pre class="src src-javascript"> <span style="font-weight: bold;">const</span> { 
    generateKeyPairSync,
    publicEncrypt,
    privateDecrypt,
    constants
} =  <span style="font-weight: bold;">await</span>  <span style="font-weight: bold;">import</span>( <span style="font-style: italic;">"node:crypto"</span>);

 <span style="font-weight: bold;">const</span> { publicKey, privateKey } = generateKeyPairSync( <span style="font-style: italic;">'rsa'</span>, {
    publicExponent: 65537,
    modulusLength: 2048,
});

 <span style="font-weight: bold;">let</span>  <span style="font-weight: bold; font-style: italic;">plaintextIn</span> =  <span style="font-style: italic;">"The quick brown fox jumps over the lazy dog"</span>;

 <span style="font-weight: bold;">const</span>  <span style="font-weight: bold; font-style: italic;">encrypt</span> = (plaintextBytes, publicKey) => {
     <span style="font-weight: bold;">return</span> publicEncrypt({
        key: publicKey,
        padding: constants.RSA_PKCS1_OAEP_PADDING,
        oaepHash:  <span style="font-style: italic;">'sha256'</span>,
    }, plaintextBytes);
};

 <span style="font-weight: bold;">let</span>  <span style="font-weight: bold; font-style: italic;">ciphertext</span> = encrypt(Buffer.from(plaintextIn), publicKey);

 <span style="font-weight: bold;">const</span>  <span style="font-weight: bold; font-style: italic;">decrypt</span> = (ciphertext, privateKey) => {
     <span style="font-weight: bold;">return</span> privateDecrypt({
        key: privateKey,
        padding: constants.RSA_PKCS1_OAEP_PADDING,
        oaepHash:  <span style="font-style: italic;">'sha256'</span>,
    }, ciphertext);
};

 <span style="font-weight: bold;">let</span>  <span style="font-weight: bold; font-style: italic;">bytesOut</span> = decrypt(ciphertext, privateKey);
 <span style="font-weight: bold;">let</span>  <span style="font-weight: bold; font-style: italic;">plaintextOut</span> = bytesOut.toString();

console.assert(plaintextIn == plaintextOut);  <span style="font-weight: bold; font-style: italic;">// </span> <span style="font-weight: bold; font-style: italic;">should pass</span>
</pre>
</div>

 <p>
In JavaScript, we use the  <code>crypto</code> module that by default ships with
Node.js.
</p>

 <p>
Similar to the Python example, we first generate a key pair, then
encrypt with the public key and decrypt with the private key.
</p>
</div>
</div>
</div>
</div>
 <div id="outline-container-org72440f3" class="outline-2">
 <h2 id="org72440f3"> <span class="section-number-2">3.</span> Conclusion</h2>
 <div class="outline-text-2" id="text-3">
 <p>
In this article we discussed a facet of asymmetric encryption, public
key encryption, which is used for secure exchange of secrets with only
knowledge of the recipient's public key required. We saw how it can be
used to exchange a shared secret key to allow two parties to
communicate securely over an insecure channel using the less
computationally intensive symmetric encryption.
</p>

 <p>
Simplified code samples are provided in Python and JavaScript
demonstrating public key encryption.
</p>

 <p>
In a follow up article, we will discuss the other facet of asymmetric
encryption, digital signatures.
</p>

 <p>
For a more in-depth exploration, check out the  <a href="https://www.crypto101.io/">CRYPTO101</a> course and the
 <a href="https://cryptopals.com/">Cryptopals</a> challenge.
</p>
</div>
</div>
</div>]]></content>
  <link href="https://satoshi.ke/public_key_encryption.html"/>
  <id>https://satoshi.ke/public_key_encryption.html</id>
  <updated>2026-07-17T16:37:00+03:00</updated>
</entry>
<entry>
  <title>Symmetric Encryption</title>
  <author><name>satoshiken</name></author>
  <summary>Published on Jan 18, 2024 10:53 by satoshiken</summary>
  <content type="html"><![CDATA[<div id="content" class="content">
 <h1 class="title">Symmetric Encryption
 <br></br> <span class="subtitle">Published on Jan 18, 2024 10:53 by satoshiken</span>
</h1>
 <div id="table-of-contents" role="doc-toc">
 <h2>Table of Contents</h2>
 <div id="text-table-of-contents" role="doc-toc">
 <ul> <li> <a href="#orgf537951">1. Introduction</a></li>
 <li> <a href="#orgf80c84d">2. Symmetric Encryption</a>
 <ul> <li> <a href="#org79f9f56">2.1. Examples in code</a>
 <ul> <li> <a href="#org5f2ef9f">2.1.1. Python</a></li>
 <li> <a href="#org41be4a3">2.1.2. JavaScript</a></li>
</ul></li>
</ul></li>
 <li> <a href="#orgacd8251">3. Conclusion</a></li>
</ul></div>
</div>
 <div id="outline-container-orgf537951" class="outline-2">
 <h2 id="orgf537951"> <span class="section-number-2">1.</span> Introduction</h2>
 <div class="outline-text-2" id="text-1">
 <p>
Since ancient days, there has always been a need for people to
securely transmit a secret message from one place to another
without interception or modification e.g. for military purposes. These
led to schemes such as the  <a href="https://en.wikipedia.org/wiki/Caesar_cipher">Caesar Cipher</a> being developed.
</p>

 <p>
In computer systems, computer security relies on three main concepts
(also known as the CIA triad):
</p>

 <dl class="org-dl"> <dt>Confidentiality</dt> <dd>Ensuring data is only accessible to
authorized parties</dd>
 <dt>Integrity</dt> <dd>Ensuring that data has not been modified by
unauthorized parties</dd>
 <dt>Availability</dt> <dd>Ensuring that systems and data are available
when needed.</dd>
</dl> <p>
This is where encryption comes into play. Encryption is the process of
encoding secret information into a concealed form that only the
intended recipient(s) can decode back to the original. This helps with
preserving confidentiality and integrity of data.
</p>

 <p>
The original message is known as  <b>plaintext</b>. It is encoded into
 <b>ciphertext</b> which appears to be a seemingly random blob of data
without meaning to anyone but the authorized parties. A piece of
information known as a  <b>secret key</b> that is known only by the
originator of the message and the intended recipient(s) is used to
both encrypt and decrypt the message i.e, turning it from plaintext to
ciphertext, and back to plaintext.
</p>
</div>
</div>
 <div id="outline-container-orgf80c84d" class="outline-2">
 <h2 id="orgf80c84d"> <span class="section-number-2">2.</span> Symmetric Encryption</h2>
 <div class="outline-text-2" id="text-2">
 <p>
There are two types of encryption, symmetric and asymmetric. In this
article we'll focus on symmetric encryption.
</p>

 <p>
(Update: See article on asymmetric encryption  <a href="public_key_encryption.html">here</a>)
</p>

 <p>
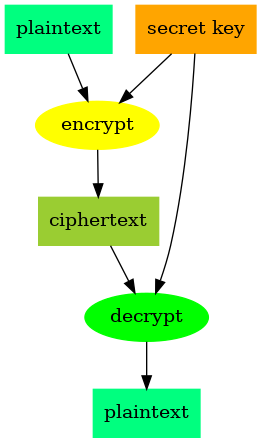
In symmetric encryption, a single key is used to both encrypt and
decrypt the message as illustrated below.
</p>


 <div id="orgc63cf54" class="figure">
 <p> <img src="img/symmetric_encryption.png" alt="symmetric_encryption.png"></img></p>
 <p> <span class="figure-number">Figure 1: </span>illustration of symmetric encryption</p>
</div>


 <p>
This means that both the sender and the recipient of the message
have to have the same key, and it has to have been shared securely
between them, because anyone with the key can decrypt the ciphertext.
</p>

 <p>
Sharing this key needs to happen in a secure channel separate from the
one transmitting the ciphertext, otherwise anyone monitoring it can
get the secret key in addition to the ciphertext and decrypt the
secret message.
</p>

 <p>
If the secret key is only being used to store encrypted information,
then transmission of the key is less of an issue, the greater
consideration is that the key itself is kept safely, because if it is
lost, the encrypted information can be considered lost as well.
</p>
</div>
 <div id="outline-container-org79f9f56" class="outline-3">
 <h3 id="org79f9f56"> <span class="section-number-3">2.1.</span> Examples in code</h3>
 <div class="outline-text-3" id="text-2-1">
 <p>
The following code examples demonstrate symmetric encryption in Python
and JavaScript. Note that these are simple examples just to
illustrate the concept. For production code, additional considerations
need to be taken into account for robustness.
</p>
</div>
 <div id="outline-container-org5f2ef9f" class="outline-4">
 <h4 id="org5f2ef9f"> <span class="section-number-4">2.1.1.</span> Python</h4>
 <div class="outline-text-4" id="text-2-1-1">
 <div class="org-src-container">
 <pre class="src src-python"> <span style="font-weight: bold;">from</span> cryptography.fernet  <span style="font-weight: bold;">import</span> Fernet


 <span style="font-weight: bold; font-style: italic;">plaintext_in</span> =  <span style="font-style: italic;">"The quick brown fox jumps over the lazy dog"</span>
 <span style="font-weight: bold; font-style: italic;">secret_key</span> = Fernet.generate_key()


 <span style="font-weight: bold;">def</span>  <span style="font-weight: bold;">encrypt</span>(plaintext_bytes, key):
     <span style="font-weight: bold; font-style: italic;">encrypter</span> = Fernet(key)
     <span style="font-weight: bold;">return</span> encrypter.encrypt(plaintext_bytes)


 <span style="font-weight: bold; font-style: italic;">input_bytes</span> =  <span style="font-weight: bold;">bytes</span>(plaintext_in, encoding= <span style="font-style: italic;">"utf-8"</span>)
 <span style="font-weight: bold; font-style: italic;">cipher_text</span> = encrypt(input_bytes, secret_key)


 <span style="font-weight: bold;">def</span>  <span style="font-weight: bold;">decrypt</span>(cipher_text, key):
     <span style="font-weight: bold; font-style: italic;">decrypter</span> = Fernet(key)
     <span style="font-weight: bold;">return</span> decrypter.decrypt(cipher_text)


 <span style="font-weight: bold; font-style: italic;">output_bytes</span> = decrypt(cipher_text, secret_key)
 <span style="font-weight: bold; font-style: italic;">plaintext_out</span> =  <span style="font-weight: bold;">str</span>(output_bytes, encoding= <span style="font-style: italic;">"utf-8"</span>)

 <span style="font-weight: bold;">assert</span> plaintext_in == plaintext_out   <span style="font-weight: bold; font-style: italic;"># </span> <span style="font-weight: bold; font-style: italic;">should be equal</span>
</pre>
</div>

 <p>
In python, we use the third party library  <code>cryptography</code> that
can be installed via:
</p>

 <div class="org-src-container">
 <pre class="src src-sh">pip install cryptography
</pre>
</div>

 <p>
It provides a class  <code>Fernet</code> that conveniently hides all the lower
level details involved in symmetric encryption. Using it, we can
generate a secret key, and use the key to create objects for both
encrypting and decrypting the plaintext.
</p>

 <p>
The plaintext in this case is a simple string, but it can be any kind
of media like sound, images etc, since the encryption process works on
raw bytes.
</p>

 <p>
Fernet will also encode the generated key and the ciphertext bytes
into a string of printable characters  <a href="https://en.wikipedia.org/wiki/Base64">Base64</a> that can be conveniently
transmitted over the network across different types of systems.
</p>

 <p>
The Fernet class uses the  <a href="https://en.wikipedia.org/wiki/Advanced_Encryption_Standard">AES</a> 128 in CBC mode algorithm for symmetric
encryption. The technical details can be found in its  <a href="https://github.com/fernet/spec/blob/master/Spec.md">spec</a>
</p>
</div>
</div>
 <div id="outline-container-org41be4a3" class="outline-4">
 <h4 id="org41be4a3"> <span class="section-number-4">2.1.2.</span> JavaScript</h4>
 <div class="outline-text-4" id="text-2-1-2">
 <div class="org-src-container">
 <pre class="src src-javascript"> <span style="font-weight: bold;">const</span> { createCipheriv, createDecipheriv, randomBytes } =  <span style="font-weight: bold;">await</span>  <span style="font-weight: bold;">import</span>( <span style="font-style: italic;">'node:crypto'</span>);
 <span style="font-weight: bold;">const</span> { Buffer } =  <span style="font-weight: bold;">await</span>  <span style="font-weight: bold;">import</span> ( <span style="font-style: italic;">"node:buffer"</span>);

 <span style="font-weight: bold;">const</span>  <span style="font-weight: bold; font-style: italic;">plaintextIn</span> =  <span style="font-style: italic;">"The quick brown fox jumps over the lazy dog"</span>;
 <span style="font-weight: bold;">const</span>  <span style="font-weight: bold; font-style: italic;">secretKey</span> = randomBytes(16);
 <span style="font-weight: bold;">const</span>  <span style="font-weight: bold; font-style: italic;">initializationVector</span> = randomBytes(16);

 <span style="font-weight: bold;">const</span>  <span style="font-weight: bold; font-style: italic;">encrypt</span> = (plaintextBytes, secretKey, initializationVector) => {
     <span style="font-weight: bold;">let</span>  <span style="font-weight: bold; font-style: italic;">cipher</span> = createCipheriv( <span style="font-style: italic;">'aes-128-cbc'</span>, secretKey, initializationVector);
     <span style="font-weight: bold;">return</span> Buffer.concat([
        cipher.update(plaintextBytes),
        cipher. <span style="font-weight: bold;">final</span>()
    ]).toString( <span style="font-style: italic;">"base64"</span>);
};

 <span style="font-weight: bold;">let</span>  <span style="font-weight: bold; font-style: italic;">bytesIn</span> = Buffer.from(plaintextIn);
 <span style="font-weight: bold;">let</span>  <span style="font-weight: bold; font-style: italic;">cipherText</span> = encrypt(bytesIn, secretKey, initializationVector);

 <span style="font-weight: bold;">const</span>  <span style="font-weight: bold; font-style: italic;">decrypt</span> = (cipherText, secretKey, initializationVector) => {
     <span style="font-weight: bold;">let</span>  <span style="font-weight: bold; font-style: italic;">decipher</span> = createDecipheriv( <span style="font-style: italic;">'aes-128-cbc'</span>, secretKey, initializationVector);
     <span style="font-weight: bold;">return</span> Buffer.concat([decipher.update(cipherText,  <span style="font-style: italic;">"base64"</span>), decipher. <span style="font-weight: bold;">final</span>()]);
};

 <span style="font-weight: bold;">let</span>  <span style="font-weight: bold; font-style: italic;">bytesOut</span> = decrypt(cipherText, secretKey, initializationVector);
 <span style="font-weight: bold;">let</span>  <span style="font-weight: bold; font-style: italic;">plaintextOut</span> = bytesOut.toString( <span style="font-style: italic;">'utf8'</span>);

console.assert(plaintextIn == plaintextOut);   <span style="font-weight: bold; font-style: italic;">// </span> <span style="font-weight: bold; font-style: italic;">should be equal</span>
</pre>
</div>

 <p>
In JavaScript, we use the  <code>crypto</code> module that is distributed by
default with Node.js. It is a bit lower level that the  <code>Fernet</code> class
we saw in Python as we have to implement a few things by hand that
 <code>Fernet</code> did automatically.
</p>

 <p>
We generate the secret key using  <code>randomBytes</code> from the  <code>crypto</code>
module.  Similar the the python example, we'll use the AES 128
algorithm in CBC mode, so the key is 128 bits (16 bytes * 8bits) long.
</p>

 <p>
An additional detail that was implicit in the python example but is
explicit here is the  <b>initialization vector</b>. This is a random piece of
information that is generated and used in each encryption operation.
It is required both for encryption and decryption.
</p>

 <p>
Its purpose is to randomize each ciphertext message transmitted across
the network even if they have the same plaintext message. This
prevents an adversary monitoring the network and collecting a large
number of ciphertext messages from being able use this data to derive
the secret key.
</p>

 <p>
In the python example, the initialization vector is generated and
attached to the ciphertext automatically, but in the JS example, we
generate it separately.
</p>

 <p>
Node.js also uses separate functions for creating encryption and
decryption objects. We need to pass in the same algorithm, secret key
and intialization vector to both for encryption and decryption to
work.  On each of the objects, we call method  <code>update</code> any number of
times to add plaintext or ciphertext, and then call  <code>final</code> to mark
the end of input. Using  <code>Buffer.concatenate</code>, we combine the byte
objects output of each of the method calls into one.
</p>
</div>
</div>
</div>
</div>
 <div id="outline-container-orgacd8251" class="outline-2">
 <h2 id="orgacd8251"> <span class="section-number-2">3.</span> Conclusion</h2>
 <div class="outline-text-2" id="text-3">
 <p>
This was a brief discussion of symmetric encryption which is a
foundational aspect of encryption that allows information to be stored
or exchanged confidentially. As demonstrated, security of the secret
key is paramount for symmetric encryption to work.
</p>

 <p>
Basic examples are provided in Python and JavaScript.
</p>

 <p>
For a more in-depth exploration, check out the  <a href="https://www.crypto101.io/">CRYPTO101</a> course and the
 <a href="https://cryptopals.com/">Cryptopals</a> challenge.
</p>
</div>
</div>
</div>]]></content>
  <link href="https://satoshi.ke/symmetric_encryption.html"/>
  <id>https://satoshi.ke/symmetric_encryption.html</id>
  <updated>2026-07-17T14:12:00+03:00</updated>
</entry>
<entry>
  <title>Hash Functions</title>
  <author><name>satoshiken</name></author>
  <summary>Published on Jan 09, 2024 05:03 by satoshiken</summary>
  <content type="html"><![CDATA[<div id="content" class="content">
 <h1 class="title">Hash Functions
 <br></br> <span class="subtitle">Published on Jan 09, 2024 05:03 by satoshiken</span>
</h1>
 <div id="table-of-contents" role="doc-toc">
 <h2>Table of Contents</h2>
 <div id="text-table-of-contents" role="doc-toc">
 <ul> <li> <a href="#org58da25e">1. Properties of a hash function</a></li>
 <li> <a href="#org3243364">2. Example Uses</a>
 <ul> <li> <a href="#org15ef168">2.1. Password authentication</a></li>
 <li> <a href="#orgef1a3e4">2.2. File Integrity Verification</a></li>
 <li> <a href="#org2fd9e75">2.3. Blockchain Implementation</a></li>
</ul></li>
 <li> <a href="#orgf3d9f0c">3. Examples in code</a>
 <ul> <li> <a href="#org2b511b1">3.1. Python</a></li>
 <li> <a href="#orgb9ea8fb">3.2. JavaScript</a></li>
</ul></li>
 <li> <a href="#org3ee9915">4. Conclusion</a></li>
</ul></div>
</div>
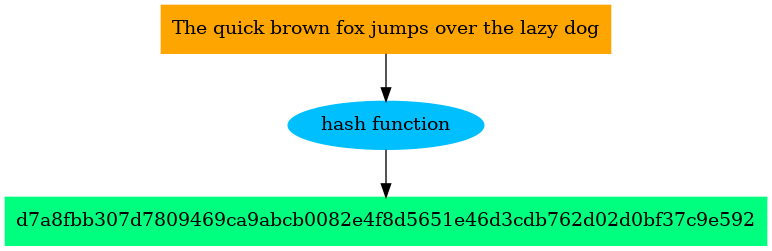
 <p>
Hashing is the process of taking in an arbitrary chunk of data of any
size and producing a corresponding fixed-size representation known as
its hash.
</p>

 <p>
A hash function implements the algorithm that transforms the input
data into its hash.
</p>


 <div id="orgecfb136" class="figure">
 <p> <img src="img/hashing.png" alt="hashing.png"></img></p>
 <p> <span class="figure-number">Figure 1: </span>hashing example: input to output</p>
</div>

 <p>
Different types of hashing algorithms exist, but each algorithm always
produces hashes of the same size for any inputs it receives. For
example, the SHA256 algorithm will always produce a hash of 256 bits
(32 bytes) long for any input passed.
</p>

 <p>
Other common hashing algorithms are MD5, which produces a 128 bit hash,
and SHA512, which produces a 512 bit hash.
</p>
 <div id="outline-container-org58da25e" class="outline-2">
 <h2 id="org58da25e"> <span class="section-number-2">1.</span> Properties of a hash function</h2>
 <div class="outline-text-2" id="text-1">
 <p>
Some desirable properties of a hash function:
</p>

 <dl class="org-dl"> <dt>Determinism</dt> <dd>For a given hashing algorithm, any input to the hash
function will always produce the same hash.</dd>

 <dt>Preimage resistance</dt> <dd>Given the output hash, it is not possible to
derive the input that was used to generate it.</dd>

 <dt>Collision resistance</dt> <dd>While it is theoretically possible to find
two inputs that produce the same hash, in practice this should be
very hard. Some algorithms are more collision resistant than
others. MD5, for example, is not recommended for any critical uses
because it is easy to find collisions.</dd>

 <dt>Avalanche effect</dt> <dd>A tiny change in the input should result in a
drastic change in the output hash.  For instance, changing even a
single character in a long block of text passed into the hash
function should result in a drastically different output hash from
the original one. This makes it much harder to predict the input
data that was used to generate the hash.</dd>
</dl></div>
</div>
 <div id="outline-container-org3243364" class="outline-2">
 <h2 id="org3243364"> <span class="section-number-2">2.</span> Example Uses</h2>
 <div class="outline-text-2" id="text-2">
</div>
 <div id="outline-container-org15ef168" class="outline-3">
 <h3 id="org15ef168"> <span class="section-number-3">2.1.</span> Password authentication</h3>
 <div class="outline-text-3" id="text-2-1">
 <p>
Password authentication relies on hashing user passwords. When a user
first provides their password, only the password's hash is stored in the
database. Any time the user is being authenticated, a hash of the
password they provide is generated on the fly and compared to the
stored one and the check passes if they match. In case the database is
ever leaked, only the hashes are compromised but not the original user
passwords. <sup> <a id="fnr.1" class="footref" href="#fn.1" role="doc-backlink">1</a></sup></p>
</div>
</div>
 <div id="outline-container-orgef1a3e4" class="outline-3">
 <h3 id="orgef1a3e4"> <span class="section-number-3">2.2.</span> File Integrity Verification</h3>
 <div class="outline-text-3" id="text-2-2">
 <p>
Verifying the integrity of downloaded files may also utilize
hashing. The file provider typically publishes the hash of each file
to be downloaded on their website. After the file has been downloaded,
a hash is generated locally and matched to the published one.
</p>
</div>
</div>
 <div id="outline-container-org2fd9e75" class="outline-3">
 <h3 id="org2fd9e75"> <span class="section-number-3">2.3.</span> Blockchain Implementation</h3>
 <div class="outline-text-3" id="text-2-3">
 <p>
A blockchain is essentially blocks of data chained together using
their hashes. The hash of the previous block is used to generate the
hash of the next block, which makes it possible to detect any
tampering of blockchain data, because any subsequent blocks will have
invalid hashes. This is how blockchains enforce immutability, i.e.,
any data accepted onto the blockchain cannot be changed.
</p>
</div>
</div>
</div>
 <div id="outline-container-orgf3d9f0c" class="outline-2">
 <h2 id="orgf3d9f0c"> <span class="section-number-2">3.</span> Examples in code</h2>
 <div class="outline-text-2" id="text-3">
</div>
 <div id="outline-container-org2b511b1" class="outline-3">
 <h3 id="org2b511b1"> <span class="section-number-3">3.1.</span> Python</h3>
 <div class="outline-text-3" id="text-3-1">
 <p>
In Python, we use the  <code>hashlib</code> module that comes with the standard
library.
</p>

 <p>
We can generate an SHA256 hash as follows
</p>

 <div class="org-src-container">
 <pre class="src src-python"> <span style="font-weight: bold;">import</span> hashlib


 <span style="font-weight: bold;">def</span>  <span style="font-weight: bold;">hash_function</span>(input_text):
     <span style="font-style: italic;">"""Returns a fixed length hash of the input"""</span>

     <span style="font-weight: bold; font-style: italic;">input_bytes</span> =  <span style="font-weight: bold;">bytes</span>(input_text, encoding= <span style="font-style: italic;">"utf-8"</span>)
     <span style="font-weight: bold;">return</span> hashlib.sha256(input_bytes).hexdigest()


 <span style="font-weight: bold; font-style: italic;">variable_length_input</span> =  <span style="font-style: italic;">"The quick brown fox jumps over the lazy dog"</span>
 <span style="font-weight: bold; font-style: italic;">fixed_length_hash</span> = hash_function(variable_length_input)

 <span style="font-weight: bold;">print</span>(fixed_length_hash)
 <span style="font-weight: bold; font-style: italic;"># </span> <span style="font-weight: bold; font-style: italic;">outputs: d7a8fbb307d7809469ca9abcb0082e4f8d5651e46d3cdb762d02d0bf37c9e592
</span>
 <span style="font-weight: bold;">print</span>( <span style="font-weight: bold;">len</span>(fixed_length_hash))
 <span style="font-weight: bold; font-style: italic;"># </span> <span style="font-weight: bold; font-style: italic;">outputs: 64</span>
</pre>
</div>


 <p>
In the snippet above, we provide a string to the hashing function
 <code>hashlib.sha256</code> and generate its hash. The function expects an input
in bytes, so we convert the string to bytes first. The generated hash
can be represented in different forms. We want an easily readable one
so we produce a  <a href="https://en.wikipedia.org/wiki/Hexadecimal">hexadecimal</a> string representation by calling
 <code>hexdigest</code> on the hash.
</p>

 <p>
As mentioned previously, SHA256 hashes are 256 bits long. Each
hexadecimal character represents 4 bits. This results in a
64-character long hash (256/4 = 64).
</p>
</div>
</div>
 <div id="outline-container-orgb9ea8fb" class="outline-3">
 <h3 id="orgb9ea8fb"> <span class="section-number-3">3.2.</span> JavaScript</h3>
 <div class="outline-text-3" id="text-3-2">
 <p>
NodeJS comes with the  <code>crypto</code> module that we can use to generate
hashes.
</p>

 <div class="org-src-container">
 <pre class="src src-javascript"> <span style="font-weight: bold;">const</span> { createHash } =  <span style="font-weight: bold;">await</span>  <span style="font-weight: bold;">import</span>( <span style="font-style: italic;">'node:crypto'</span>);

 <span style="font-weight: bold;">const</span>  <span style="font-weight: bold; font-style: italic;">hashFunction</span> = (input_text) => {
     <span style="font-weight: bold;">const</span>  <span style="font-weight: bold; font-style: italic;">hash</span> = createHash( <span style="font-style: italic;">'sha256'</span>);
    hash.update(input_text);
     <span style="font-weight: bold;">return</span> hash.digest( <span style="font-style: italic;">'hex'</span>);
};

 <span style="font-weight: bold;">let</span>  <span style="font-weight: bold; font-style: italic;">variableLengthInput</span> =  <span style="font-style: italic;">"The quick brown fox jumps over the lazy dog"</span>;
 <span style="font-weight: bold;">let</span>  <span style="font-weight: bold; font-style: italic;">fixedLengthHash</span> = hashFunction(variableLengthInput);

console.log(fixedLengthHash);
 <span style="font-weight: bold; font-style: italic;">// </span> <span style="font-weight: bold; font-style: italic;">outputs: d7a8fbb307d7809469ca9abcb0082e4f8d5651e46d3cdb762d02d0bf37c9e592
</span>
console.log(fixedLengthHash.length);
 <span style="font-weight: bold; font-style: italic;">// </span> <span style="font-weight: bold; font-style: italic;">outputs: 64</span>
</pre>
</div>

 <p>
Notice that for the same input as we had in Python, we received the
same hash.
</p>

 <p>
 <code>createHash</code> returns the object that will generate the hash.  We add
the text to be hashed using  <code>update</code>, and get the hash output using
the  <code>digest</code>. This gives us the 64-character hexadecimal hash.
</p>
</div>
</div>
</div>
 <div id="outline-container-org3ee9915" class="outline-2">
 <h2 id="org3ee9915"> <span class="section-number-2">4.</span> Conclusion</h2>
 <div class="outline-text-2" id="text-4">
 <p>
Hash functions are a fundamental building block in cryptography. Most
cryptographic operations rely on the fact that a hash of arbitrary
data can be generated. We shall be looking at some of these operations
in future posts.
</p>
</div>
</div>
 <div id="footnotes">
 <h2 class="footnotes">Footnotes: </h2>
 <div id="text-footnotes">

 <div class="footdef"> <sup> <a id="fn.1" class="footnum" href="#fnr.1" role="doc-backlink">1</a></sup> <div class="footpara" role="doc-footnote"> <p class="footpara">
Note that this is a simplistic scenario that can be defeated by
the rainbow table attack. A more secure setup is hashing a salt
along with the password
</p></div></div>


</div>
</div></div>]]></content>
  <link href="https://satoshi.ke/hash_functions.html"/>
  <id>https://satoshi.ke/hash_functions.html</id>
  <updated>2026-07-16T15:36:00+03:00</updated>
</entry>
</feed>